
Canning How To: Water Bath Method

With canning, there are multiple methods of preserving your food. This method is the water bath method, which is best for acidic foods such as tomatoes, apples, pickles, jellies, etc. Other methods include pressure canning, which involve the use of a pressure cooker. The water bath method is much easier for beginner canners, and can be accomplished with a few tools, many of which are staples in any kitchen.


ENVIRONMENTAL BENEFITS OF CANNING
Buying in season, local produce and canning yourself can significantly cut down on the carbon emissions caused by food transportation of jarred and canned goods
Homemade canned goods are wonderful (and delicious) low-waste gift to give to family & friends, to keep for emergency food rations, or to make cooking a weekday meal quick & easy
Buying pre-packaged and convenience food from fast food chains or grocery stores promotes the use of single use containers, utensils, napkins, and more that’ll end up in landfills and oceans, whereas making the same meal at home makes single use items obsolete

Canning How To: Water Bath Method
Prep time: 15 minutes
Cook time: 1 hour - 1 1/2 hours
Cool time: 6 - 12 hours

Tools:
- 1 Large Pot
- 1 Small Saucepan
- 1 Canning Funnel
- 1 Wooden Skewer
- A Few Dish Towels
- 1 Small Tongs
- 1 Canning Lifter
- 1 Ladle
- 6-10 Canning Jars
- 6-10 Canning Rings
- 6-10 Canning Lids (must be new/unused)
- A Few Pot Holders or Heat Gloves
Instructions:
1. SANITIZE: Before starting the canning process, you have to prepare all of the jars that you will be canning into. Wash all of the jars with hot soapy water, making sure to thoroughly clean each. Do the same with the rings and lids, drying them off and placing them near the stove for easy access.
2. BOIL: Fill both the large pot and small saucepan halfway full with water, placing both on the stove. In the large pot, place in as many jars as you can fit in one layer, around 6 or 7, making sure that each is upright, fully submerged, and with no air pockets trapped inside. In the small saucepan, place in the same amount of canning lids as you have jars, making sure that each is laying with the rubber side up, and no two lids are directly on top of one another. Bring both pots to a boil.
3. PREP: In the area you plan on canning everything, clear off a large working space. Place down a few towels onto the countertop, this will protect both the hot jars and your countertop from cracking from rapid heat change. Next to those, prepare the workspace by getting your tools nearby (canning funnel, wooden skewer, small tongs, canning lifter, ladle, canning rings, & pot holders).
4. CANNING: Once your sauce or jelly canning substance is at a simmer, and your pots of jars & lids are at a boil, you are ready to can! With the small tongs, grab a lid out the saucepan and place it on the towel. With the canning lifter, carefully take a boiled jar out of the pot, dumping out all of the water inside, then place it onto the toweled work surface. Scoop the sauce into the jars, using the canning funnel for easier control, then pop all the air bubbles in the jar with the wooden skewer. Wipe off the rim of the jar with a towel, then place on a lid and screw on a jar lid tight. Set it to the side, and repeat this for the remaining jars in the pot.
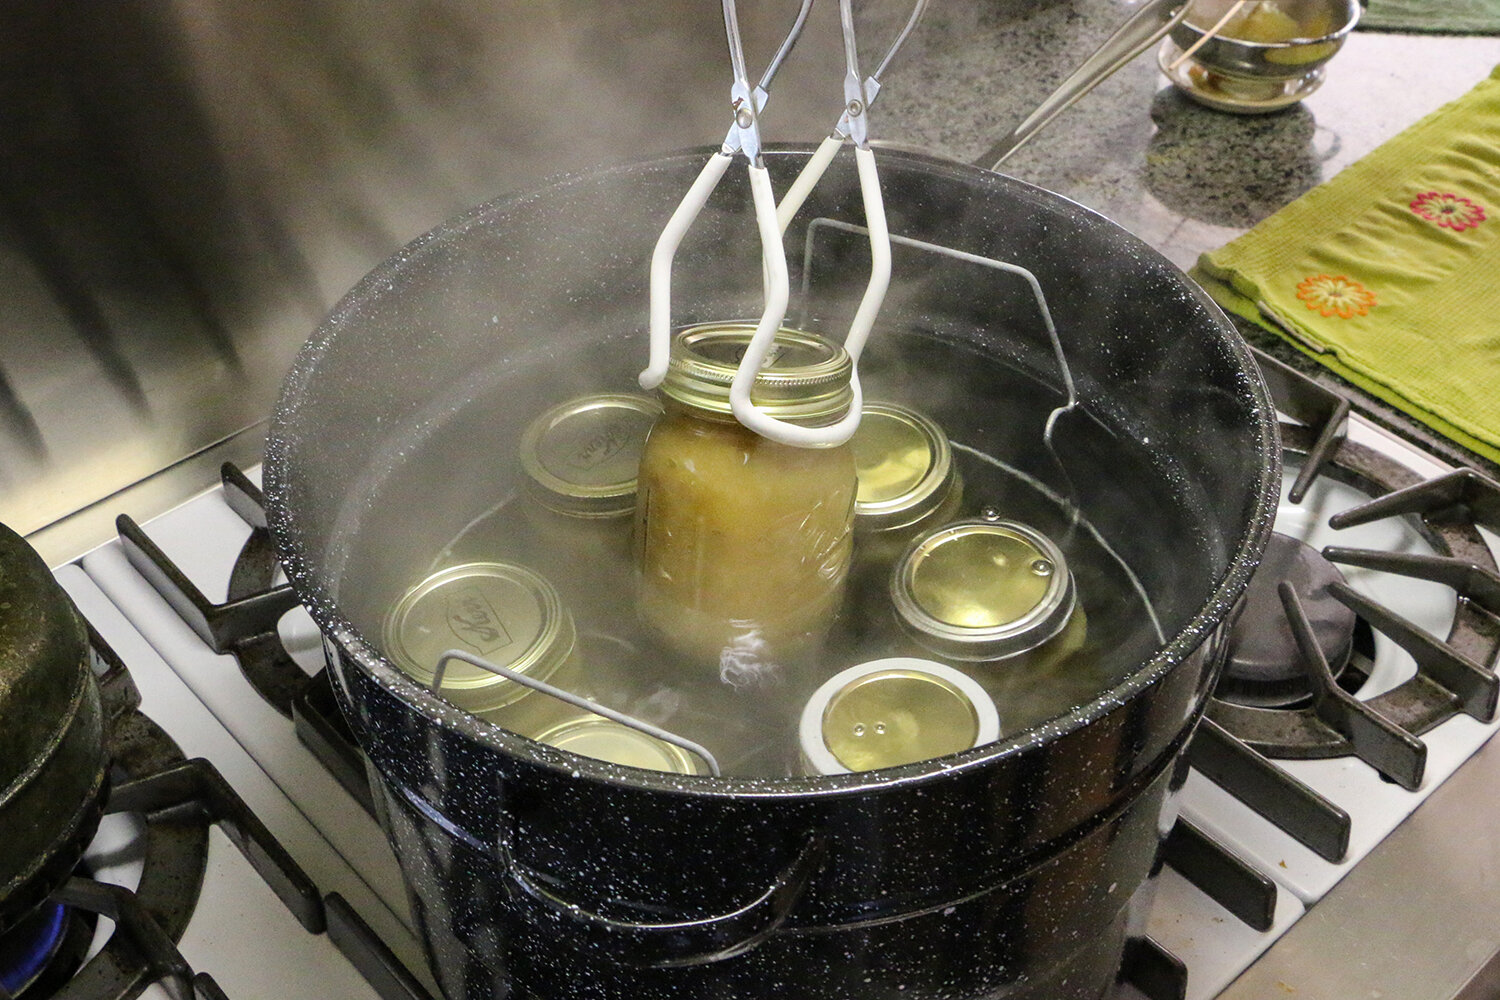
5. WATER BATH: Once all the jars have been filled, add a few more cups of boiling water to the large pot. Then place all of the jars into the pot upright, making sure the water is at least 1 inch above the jars once they are all in. Bring the pot back up to a boil, and leave the jars in for the full processing once boiling. (Processing time will vary heavily depending on what is being canned, this should be verified before the second boil.) Carefully remove the jars from the water, placing them back onto the towels, leave them to cool completely for a few hours. After a few minutes, the jars should begin to make a popping sound, ensuring that there is a vacuum seal inside the jars. If any of the jars have not popped after they have fully cooled, that jar should be refrigerated and eaten first, as it will not have been properly preserved.
Notes:
Processing Times - Safety First - When working with liquids at a very high temperature, and it’s extremely important to remember how to handle these materials safely when canning. Be careful of splashing boiling water and handling hot items like jars & lids. It’s also important to remember that quick changes in temperature can cause glass to shatter, so make sure that jars are properly heated before adding hot jellies or sauces, and that work surfaces are covered to prevent damage.

Did you make this recipe?
We love to see your pictures!
Tag @simple_ecology and hashtag it #simpleecology
© Simple Ecology

